Microsoft Flow – Get to the documents from a Teams library in a dynamic way
Last week I had to build a Flow that copies signed documents from a Microsoft Team library to a document library of a SharePoint team site. The customer wants to keep all signed contracts into one place before archiving the Microsoft Team.
The input of the Flow is the name of the Team that needs to be inspected for signed documents.
The Get files action requires following input:
- The URL to the SharePoint site where the files are stored
- The guid of the library where the files are stored
HTTP request to get the Teams
To retrieve the Teams from Flow, we can use the Microsoft Graph API. Teams can be retrieved by using the following endpoint:
https://graph.microsoft.com/beta/groups
To retrieve one single Team, we use a filter:
$filter=displayName eq'variables(TeamsName)'
Before the HTTP request will execute successfully, we need to foresee authentication. I registered an app in Azure Active Directory and granted application rights to at least “Read all groups”.

There are a lot of tutorials online that explain how to register an app with Azure AD and how to grant permissions to the several APIs.
I stored the following data needed by the HTTP request in variables:
- The tenant ID of your O365 tenant
- The Client ID (of the app registered in Azure AD)
- The Client Secret (which is the key that has been granted to your app during registration)
The action I used, is an HTTP request:

When this action executes successfully, I can parse the resulting JSON that contains the Id of the Team:

And store the Id of the Team into a variable.

HTTP request to get to the URL of the SharePoint site
The Get Files action requires two parameters: the Site Address and the ID of the document library.
Executing the following call to the Graph API will return the URL to the SharePoint site behind the Teams:
https://graph.microsoft.com/beta/groups/variables(TeamsId)/sites/root/WebUrl
We execute this call in a second HTTP request action:

We parse the JSON to isolate the URL of the SharePoint site behind the Team.
HTTP request to get the ID of the document library of the Team
Now we need to get to the document library behind the Team. Therefore we first need to retrieve the ID of the SharePoint site. (We cannot get to the document library based on the URL of the SharePoint site, wich we retrieved in the previous step).
Executing the following call to the Graph API will return the URL to the SharePoint site behind the Teams:
https://graph.microsoft.com/beta/groups/variables(TeamsId)/sites/root/Id
We execute this call in a HTTP request action:

Now we have the id of the SharePoint site behind the Teams. This ID looks something like this:
<tenant>.sharepoint.com,776e26ce-c949-4d33-a6e2-90dbe4c45f04,10a23c2e-49ee-4e3d-80f9-f534b978dbfe
(Not a single GUID we are used to).
Again we need to parse the resulting JSON in order to isolate the id of the SharePoint site.
With this ID, we can execute another call to the Graph API to get to the document library:
https://graph.microsoft.com/v1.0/sites/output('<site id>') /lists?$filter=displayName eq 'Documents'
The HTTP action looks like this:

Where value is the outcome of the Parse JSON action right before.
The resulting JSON contains the Id and the URL of the document library. We parse the resulting JSON again in order to isolate the ID of the document library.
Now we have all the variables to configure the Get Files action to retrieve the documents in the document library of the Teams.


Executing the Get Files action will also return the folders in the document library. How to filter out the files, and how to filter out the name of the channel to which the document belongs, will be subject to a next post.
Microsoft Flow – Create a Document Set
Currently Microsoft is working on the modern view for document sets. The release is foreseen beginning 2019. Currently we are not able to attach a Flow to a document set. Perhaps that’s coming too beginning next year. But in the meantime, you have to find a work around to start your Flow.
You can create a PowerApp that asks you for the metadata of the document set. In my case the requirement of creating a document set during a Flow is just part of a bigger ask, but for the purpose of this blog post, I created a document in the root of my document library to kick off the flow: I select the document, click on the Flow button and choose my flow “Create document set”.

I found the information for this Flow in many posts scattered over the internet. Therefore I decided to write a blog post specifically dedicated to creating Document sets through Flow.
Steps to create this flow:
- Ask the user for input
- Get the ID of the list document set
- Create the document set
- Update the properties of the document set
Ask the user for input
When the user starts the flow, I show a launch panel to capture the metadata of the document set.

This is achieved by adding output fields to the “For a selected item” step.

Name of the document set and project code are text fields, but the Start date should be a DateTime field, but unfortunately, that doesn’t exist (yet) in Flow. Therefore, my 3 output fields are defined as Text fields.
Get the ID of the list document set
When a content type is added to a list or document library, SharePoint creates a copy of that content type. Therefore we need to retrieve the ID of the list content type in order to be able to create a document set based on that content type.
This step can only be achieved by executing a GET request against the REST api of SharePoint Online. Therefore I added a “Send an HTTP request to SharePoint” action to my flow.
Important info to pass in this action:
- Use the GET method to retrieve data
- The GET method needs to be executed against the current site URL
- To retrieve the ID of a list document set content type, use the following URI, where the filter is set to the name of the content type you want to retrieve:
_api/web/lists/getbytitle('Documents')/contenttypes?$filter=Name%20eq%20%27Project%20Document%20Set%27
- The GET method also needs some headers:
- Content-Type application/json;odata=nometadata
- Accept application/json;odata=nometadata

The previous step will return a long string of JSON. We need to parse this JSON string to filter out the ID of the desired content type.
To parse the JSON, I added a “Parse JSON” action. This action asks for the definition of the payload. In a post of my dear friend Serge Luca he explains the easiest way to find out the schema of the payload:
- Run the flow once (it does not matter if the flow succeeds or fails)
- Go to the run history of the last run of the flow
- Expand the step that executes the HTTP GET request to the REST API
- Copy the JSON in the OUTPUTS section

- Go back to the flow in Edit mode and expand the”Parse JSON” step.
- Place your cursor in the text box next to Content.
- Select the Body object from the Dynamic content popup.

- I renamed the step to ParseDocumentSetContentType
- Click the “Use sample payload to generate schema” link

- Paste the copied JSON into the popup dialog and click Done.

The payload schema will be constructed based on the sample payload you pasted in.

Somewhere in that payload the ID of the document set content type is returned. Now we need to filter that ID out. As you can see in the schema, there is a value property of type array. This means that the value property contains a number of properties like f.e. Description, but also the StringId which is the string representation of the content type ID.
Perhaps there is another way to get to the StringId property, but this is how was able to isolate the StringId:
- I added a Compose action to get the value property.
- In the Expression tab of the Dynamic content popup I added the following expression:
first(body('ParseDocumentSetContentType')['value'])


- I added another action Apply to each to loop through all properties in the value array.
- After having selected the value object from the Dynamic content popup, I added an additional Compose action inside the Apply to each action to get to the StringId.
- I was able to select that from the Dynamic content popup under the section ParseDocumentSetContentType:

- I renamed this action to GetDocumentSetId, as I need the output from this action in a later step.

Create the document set
When we create the document set, we need the name of the new document set. This information was entered by the user when launching the flow.
- I added a Compose action that I rename to DocumentSetName
- I select the Name document set input value from the Dynamic content popup

This results in the following:

Now that we have all necessary data, we can create the document set. Also this step can only be achieved by using the REST api.
Important info to pass in this action:
- Use the POST method to create the document set
- Use the following URI to get to the document library where you want to create the document set:
_vti_bin/listdata.svc/Documents
- The POST method also needs some headers:
- Accept application/json;odata=verbose
- Slug concat(‘https://recopio0409.sharepoint.com/sites/projects/Shared%20Documents/’,outputs(‘DocumentSetName’),’|’,outputs(‘GetDocumentSetId’))

Update the properties of the document set
We also need to set the metadata of the document set. This metadata was entered by the user when launching the flow. I added a few Compose actions to capture the user input.

When the creation of the document set was successful, a JSON payload is returned to the flow containing the ID of the newly created document set. To get the payload, go to the run history of the flow. You’ll find the payload in the Outputs section.

Make a copy of this payload and return to Edit mode of your flow. Add a Parse JSON action, rename it properly and select the Body from the Send HTTP request to SharePoint to create document set section.

Click the Use sample payload to generate schema link and parse the copied payload.

After clicking the OK button, you’ll have the correct schema.
The last action we have to add is again an HTTP request to SharePoint to update the properties of the document set.

Useful info to pass in this action:
- Use the POST method to update the document set
- Use the following URI to get to the document library where you want to create the document set:
_api/web/lists/getbytitle('Documents')/items()
- Select the variable DocumentSetId from the Dynamic content popup, and drag it between the brackets of items()
- The POST method also needs some headers:
- Content-Type application/json;odata=verbose
- Accept application/json;odata=verbose
- X-HTTP-METHOD MERGE
- If-Match *
- The body needs to be constructed based.
     {
        "__metadata":{
        "type":"SP.Data.Shared_x0020_DocumentsItem"
     },
        "ProjectCode":""
     }
The value for ProjectCode can be selected in the Dynamic content popup under the section for a selected item.
Tip:
I spent some time in finding out the real __metadata type that needs to be passed in the POST request. When analyzing the payload that comes back from the action “Send HTTP request to SharePoint to create documentset” I thought that the __metadata type was “SP.Data.DocumentsItem”. After several failed runs I added an additional Send HTTP request to SharePoint action to retrieve the document set item based on its ID. That step learned me that the __metadata type is “SP.Data.Shared_x0020_DocumentsItem”.

It took me a few hours to make the flow work correctly. I hope this post can help someone out! Good Luck!
Useful posts that helped me build my solution:
Site Scripts & Site Designs – the new way of building Site Templates

During the past few years, we have seen passing by many ways to provision site collections in SharePoint Online. This is also due to the pace in which O365 and SharePoint Online evolve.
The new kid on the block is Site Designs and Site Templates to provision O365 groups. Out of the box, you can create two types of modern team sites: a modern team site and a communication site.

Since spring 2018 we can build our own custom templates on top of a modern team site or communication site. Once deployed to the O365 tenant, the new templates become selectable when creating a new team site or communction site:

The fun thing is that you can see what is provisioning during site creation:

The templates must be written in JSON.
In May 2018 I presented this topic on the Techorama conference, but a lot of functionality was still missing. For example, you could create site columns based on Text, Note, Number, Boolean, User, or DateTime. For all other data types, or if you need to precise a format, you have to define your column in XML. BUT you could only use the XML format for columns on a list or document library, not for a site column. The only way to solve this issue, was to work with Azure functions, which can be called by a Flow, which can be triggered from within a Site Design.
Thanks to the summer update, this is solved now: you can now add site columns using XML through the createSiteColumnXml action. There are a few other additional actions, but this one is the most important to me.
You can find the official documentation here. And there are also a lot of samples on GitHub. These samples demonstrate everything that is possible with Site Scripts & Site Design.
There are still a number of disadvantages to it:
- This creates an O365 group, not a Team
- You cannot create sub sites using this technique (but that’s not surprising as Microsoft tends to move away from sub sites, and favouring hub sites)
- You can have only 30 cumulative actions and/or 30K character limit per site design
- You can deploy max 100 different site templates to your tenant
I hope that the first issue will be solved in the near future. Additional functionality will be announced at Ignite. I’m really looking forward to it!
Working with Microsoft Graph to access o365 Planner
I’m currently working on a project where I have to migrate classic SharePoint tasks lists to Planner in O365. It cannot be done using CSOM, but there is a Planner REST API you can use.
This post does not contain new stuff, but I had to read trough hundreds of posts to get it all together. Therefore, I decided to write a post for whom it may be helpful.
I wrote a simple MVC-based Azure web site to do the work, nothing fancy, as it is just to migrate existing tasks lists. But you cannot communicate with your O365 tenant through Graph using SharePointOnlineCredentials. Therefore, I first registered an Azure App to have a ClientID/ClientSecret combination:

The Redirect URL is the URL to where I deployed my Azure web site (which is not described in this blog post)
Planner is part of O365 groups, so you have to give this Azure App at least read permissions to the O365 groups in your tenant. Via the Required permissions setting, I can give access to my application to as many APIs as available.

I selected the Graph API, and gave my application the permission to read from site collections and to read/write O365 groups:

I also had to click the Grant Permissions button. As an you then consent to an application’s delegated permissions on behalf of all the users in your tenant.
Read more Azure App registrations.
This gives me the permission to request data about all O365 groups in my tenant.
Now it is coding time 🙂
First I need to get an access token based on the client ID and client secret of the Azure App I just registered:
private async Task<string> GetAccessToken(string resourceId)
{
    try
    {
        var authority = ConfigurationManager.AppSettings["ida:AuthorizationUri"] + ConfigurationManager.AppSettings["ida:TenantId"];
        var clientCredential = new ClientCredential(ConfigurationManager.AppSettings["ida:ClientId"],
        ConfigurationManager.AppSettings["ida:ClientSecret"]);

        AuthenticationContext ac = new AuthenticationContext(authority);
        AuthenticationResult result = await ac.AcquireTokenAsync(resourceId, clientCredential);

        return result.AccessToken;
     }
     catch (Exception ex)
     {
         // TODO: log the exception
         return null;
     }
 }
- The AuthorizationUri is https://login.windows.net/
- The TenantId is the ID of your O365 tenant. If you don’t know the ID, you can find it in your Azure portal: navigate to Azure Active Directory > Properties, and in the Map ID, you’ll find your tenant ID
- The ResourceId is the Graph URI: https://graph.microsoft.com
Tip: You can verify if you have a valid access token by going to https://jwt.io/
Next step is to retrieve the O365 group:
 string restUrl = string.Format("https://graph.microsoft.com/v1.0/kboske.com/groups?$filter=displayname eq '{0}'", groupName);
 Task<string> getGroupTask = Task<string>.Run(() => GetResponse(restUrl, accessToken));
 getGroupTask.Wait();
If you get a successful response, you will get something like this:

My GetResponse method is very basic, but I add it in here for completeness:
private async Task<string> GetResponse(string restUrl, string accessToken)
{
    string jsonresult = null;

    try
    {
       using (HttpClient client = new HttpClient())
       {
          var accept = "application/json";
          client.DefaultRequestHeaders.Add("Accept", accept);
          client.DefaultRequestHeaders.Authorization = new AuthenticationHeaderValue("Bearer", accessToken);
          using (var response = await client.GetAsync(restUrl))
          {
              if (response.IsSuccessStatusCode)
              {
                  jsonresult = await response.Content.ReadAsStringAsync();
              }
              else
              {
                   throw new Exception("Error getting data: " + response.StatusCode.ToString());
              }
          }
       }
    }
    catch (Exception ex)
    {
       // TODO: handle the exception
    }
    return jsonresult;
}
Once I get the group Id, I can get to the plan, using the following REST call, no?
restUrl = string.Format("https://graph.microsoft.com/v1.0/recomatics.com/groups/{0}/planner/plans", groupId);
No, you can not!! You get a
But when I try to access Planner, I get a 401 – Unauthorized error instead.

It seems you can only access the plans by using user credentials because you can only access the plans to which you have permissions.
I changed the GetAccessToken method, in order to authenticate with my user credentials:
private async Task<string> GetAccessToken(string resourceId, string userName, string password)
{
    try
    {
        var authority = ConfigurationManager.AppSettings["ida:AuthorizationLoginUri"] + ConfigurationManager.AppSettings["ida:TenantId"];
        var authContext = new AuthenticationContext(authority);
        var credentials = new UserPasswordCredential(userName, password);
        var authResult = await authContext.AcquireTokenAsync(resourceId, ConfigurationManager.AppSettings["ida:ClientIdNativeClient"], credentials);

        // Get the result
        return authResult.AccessToken;
    }
    catch (Exception ex)
    {
       // TODO: handle the exception
       return;
    }
 }
But then I get a different error:
"AADSTS70002: The request body must contain the following parameter: 'client_secret or client_assertion'."
That’s because my Azure App only accepts client id / client secret combination because I registered it as a Web service. To be able to authenticate using my user credentials, I have to register an Azure App as a Native client:

When I now call the REST endpoint to get to the plan of my O365 group, I get a successful response:

Tip: try out your REST calls in the Graph explorer
Helpful posts:
Format your columns with JSON
Recently, Microsoft introduced the possibility to customize the formatting of fields using JSON. Currently this is only available in SharePoint Online.
Do know that there is a difference between Column Formatting and the Field Customizer extension of the SharePoint Framework:
- The Field Customizer is more powerful, because you can use it to write code to control how a field is displayed.
- Column formatting is more easier but less flexible, because it does not allow for custom code; it only allows for certain predefined elements and attributes.
When you create a site columns or a field on a list or library, you can specify your custom format in the Column Formatting section of the Field settings page.

If the field already exists and you want to apply additional column formatting, you can click the arrow next to the column and choose Column settings > Format this column. The pane on the right of the page will allow you to apply your custom format:

You can use column formatting to apply styles, classes, and icons to fields, depending on the value inside those fields. Column formatting is done using JSON.
You can learn more about the JSON you can use to format fields here:
To preview the formatting, select Preview; to commit your changes, select Save. When you save, anyone who views the list will see the customization that you applied.
This is how you do it when you configure your SharePoint fields in the browser. But if you provision your SharePoint artifacts in code, you can use the new Field attribute CustomFormatter to specify your custom formatting:
<Field ID="{b75d0647-1950-46ef-b4f5-dbf0608191b7}" DisplayName="Amount" Name="Amount"
       Type="Number" Decimals="2" Percentage="FALSE"
       SourceID="{ca3e8e77-ebc9-4f1d-b0a8-7ea39bbd4b5e}"
       CustomFormatter="{<your json>}" Version="1" />
Important to know is that, when a field is deployed this way, the CustomFormatter will only be applied in the modern list view; it will not be applied when the list is in classic view.
I tested this on a document set with a column that is shared with its underlying documents. I created the following content types:
- a content type “Insurance Dossier” based on the Document set content type
- a content type “Contract” based on the Document content type
Both content types share the same site column “Balance”.
The first picture shows the modern view:

The second picture shows the classic view (modern view is not yet possible within a document set):

Making custom list forms with PowerApps
Finally, the long awaited feature to create custom list forms with PowerApps has been released last week!
Custom list forms could be handy when you are facing one of the following scenarios:
- When you need extra validation of the input data.
- When you need to visualize certain fields differently. For example, if you need to specify a location, you could visualize it with the Bing control.
- When you there is a need for cascading dropdowns (list options in a second dropdown must be limited based on the selection made in a first dropdown.
- When there is a need to hide or show certain sections on the form, based on a selected option
It is very simple to start the creation of a custom form: on the list view, select the PowerApps button and choose Customize forms:

This will open the PowerApps canvas where you can start customizing your form.
There is also a change in the List Settings to give you the possibility to switch between the default forms, InfoPath forms and PowerApps forms: go to List Settings > Forms settings:

To start with this feature, you can read the following:
https://powerapps.microsoft.com/en-us/blog/q3-2017-update/
https://docs.microsoft.com/en-us/powerapps/customize-list-form
This feature is only available in SharePoint Online, and only for lists; not (yet) for document libraries.
SharePoint Online – Permanent links to documents
Sometimes I get the question how you can reference a document stored on SharePoint from within a Word document, or from within CRM, without risking to end up with a broken link, even after the document is moved or renamed.
You can achieve this by activating the Document ID Service feature, which is a site collection feature. This feature already exists for a long time in SharePoint, but as this question comes up regularly, I decided to write a post about it.

This feature assigns a unique id to each document. If you now go to a document in a document library, and you click the Copy link button,

you get a URL similar to this:
https://boske.sharepoint.com/sites/projects/ABC/_layouts/15/DocIdRedir.aspx?ID=PROJECTDOC-476-47&e=586b214f0a64467cbd65c8b26c469dc1
If you rename a document, or move it, this URL still works. Also URLs as follows will work, as long as the URL is a valid URL to an existing SharePoint site, and as long as this SharePoint site has the Document ID service feature activated:
https://boske.sharepoint.com/sites/accounts/_layouts/15/DocIdRedir.aspx?ID=PROJECTDOC-476-47&e=586b214f0a64467cbd65c8b26c469dc1
https://boske.sharepoint.com/teams/group123/_layouts/15/DocIdRedir.aspx?ID=PROJECTDOC-476-47
If you look at the URL of the opened document, you will see something like this:
https://boske.sharepoint.com/:w:/r/sites/projects/ABC/_layouts/15/WopiFrame.aspx?sourcedoc={28027ac9-1ca9-4f46-98c3-ea47c9983bbe}&action=default
You can even get to the document using your OneDrive URL, (but again, the Document ID service feature needs to be activated on your OneDrive, which is a site collection):
https://boske-my.sharepoint.com/personal/kboske_com/_layouts/15/DocIdRedir.aspx?ID=PROJECTDOC-476-47
If you delete the site or the site collection afterwards, the URL will not work anymore, even if you moved the document to another location. Therefore I advise my users to use the URL of the root SharePoint site:
https://boske.sharepoint.com/_layouts/15/DocIdRedir.aspx?ID=PROJECTDOC-476-47
As long as the document exists in one of your SharePoint Online sites, you will be able to reference it this way.
For the record, in SharePoint 2016 we have durable links. You can find a good blog post on durable links in SharePoint 2016 here. As far as I know, this is different from SharePoint Online. If you know of a different way for SPO, please leave a comment.
Adding Enterprise Keywords to your lists with CSOM
You can find a lot of posts that show you how to add the Enterprise Keyword to your lists and libraries:
$ctx = New-Object Microsoft.SharePoint.Client.ClientContext($siteUrl)
$ctx.Credentials = [System.Net.CredentialCache]::DefaultNetworkCredentials

$sprootweb = $ctx.Site.RootWeb
$taxKeywordField = $ctx.Site.RootWeb.Fields.GetByInternalNameOrTitle("TaxKeyword");
$list = $sprootweb.Lists.GetListByTitle("Documents");
$ctx.Load($sprootweb)
$ctx.Load($taxKeywordField)
$ctx.Load($list)
$ctx.ExecuteQuery()

$list.Fields.Add($taxKeywordField)
$ctx.ExecuteQuery()
This code snippet works fine if you have no or only one content type on your list or library. But if you have more content types attached to the list or library, only one content type is correctly modified, and it’s not always the default content type. You have to add the Enterprise Keyword column to the other content types yourself:
# get the Enterprise keyword from the list
 $field = $list.Fields.GetById($taxKeywordField.Id)
 $ctx.Load($field)
 $ctx.ExecuteQuery()

# add the Enterprise Keyword to all content types
 $cts = $list.ContentTypes
 $ctx.Load($cts)
 $ctx.ExecuteQuery()
 foreach ($ct in $cts)
 {
    # get all fields associated with the content type
    $fieldRefCollection = $ct.FieldLinks
    $ctx.Load($fieldRefCollection)
    $ctx.ExecuteQuery()

    # add a FieldLink for the Enterprise Keyword
    $fieldLink = New-Object Microsoft.SharePoint.Client.FieldLinkCreationInformation
    $fieldLink.Field = $field
    $ct.FieldLinks.Add($fieldLink)
    $ct.Update($false)
    $ctx.ExecuteQuery()
 }
And it’s the same story with the views: the Enterprise Keyword is not automatically added to the list views.
 # add the enterprise keyword field to all views
 $views = $list.Views
 $ctx.Load($views)
 $ctx.ExecuteQuery()

 foreach ($view in $views)
 {
    $view.ViewFields.Add($field)
    $view.Update()
 }
 $ctx.ExecuteQuery()
New version of the CAML Designer Released!
Andy Van Steenbergen and I finally released a new version of the CAML Designer; and this is a version we are very proud of!
This version of the CAML Designer now works on SharePoint 2007, SharePoint 2010, SharePoint 2013, SharePoint 2016 and SarePoint Online; AND it supports multi-factor authentication for SharePoint Online!
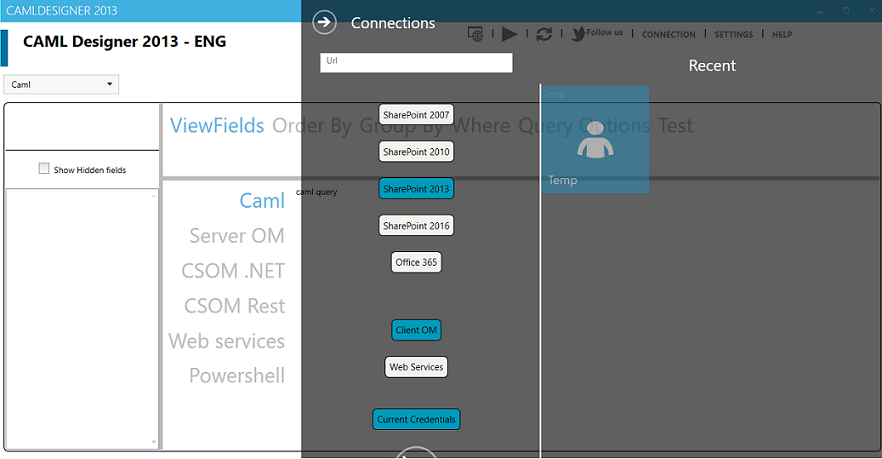
As you can see we changed the way you can connect to SharePoint: there are only 2 ways to connect:
- through the client-side object model (CSOM) for SharePoint versions 2010, 2013, 2016 and O365
- through the web services to be able to connect to SharePoint 2007
Yes, you read it correctly! The CAML Designer now works on ALL versions of SharePoint (except for SharePoint 2001)! We didn’t test the connection to SharePoint 2003, but I bet it will also work.
Another cool and much desired functionality we added to the CAML Designer, is the possibility to connect to SharePoint Online through multi-factor authentication.
The snippets are still generated for:
- raw CAML
- Server object model
- CSOM
- REST
- Web Services
- PowerShell
You can download the tool from the BIWUG site. There you will find a link to download the application.
A detailed explanation on how to use the tool can be found here.
Have fun with it and please, don’t hesitate to give us your feedback at camlfeedback@biwug.be !!
Creating fields using CSOM in SharePoint 2013
Recently I had a reader who asked how to to configure a calculated default value like “=YEAR([Today])”. This is not possible within one field as you cannot use [Today] or [Now] within the formula of a calculated field. The only way to solve this is to create 2 columns:
- A DateTime field with default value Today. You can set this to hidden if you don’t want your users to see it.
- A calculated field that outputs the year of your DateTime field.
Here is the code snippet:
private static void CreateCalculatedFieldBasedOnToday(ClientContext context)
{
     Web web = context.Web;
     List list = web.Lists.GetByTitle("CSOMFields");
     context.Load(list);
     context.ExecuteQuery();

     // Create a DateTime field that yields to Today
     string schemaTodaysDate = "<Field ID='{297B3AA2-85AD-408D-8346-0B64721C8090}' Type='DateTime' Name='TodaysDate' StaticName='TodaysDate' DisplayName='TodaysDate' Format='DateOnly' Hidden='FALSE' >"
           + "<Default>[Today]</Default></Field>";
     Field todaysDateField = list.Fields.AddFieldAsXml(schemaTodaysDate, true, AddFieldOptions.AddFieldInternalNameHint);
     context.ExecuteQuery();

     // Create a Calculated field that displays the Year of the Today field
     string formula = "<Formula>=YEAR(TodaysDate)</Formula>";
     string schemaCalculatedField = "<Field ID='{446A6933-1751-474D-A407-9EE0250C708B}' Type='Calculated' Name='TodaysYear' StaticName='TodaysYear' DisplayName='Todays Year' ResultType='Number' Decimals='0' Required='TRUE' ReadOnly='TRUE'>" + formula + "</Field>";
     Field calculatedField = list.Fields.AddFieldAsXml(schemaCalculatedField, true, AddFieldOptions.AddFieldInternalNameHint);
     context.ExecuteQuery();
}
Update: Steve Moucheron sent me his code snippet in which he solves in one go:
string fieldXml = "<Field DisplayName='Year' Type='Text'>"
   + "<DefaultFormula>=CONCATENATE(YEAR(Today))</DefaultFormula>"
   + "</Field>";
Field field = list.Fields.AddFieldAsXml(fieldXml, true,
    AddFieldOptions.defaultValue);
context.ExecuteQuery();
About

I’m Karine Bosch and currently I’m working as a freelance O365 and SharePoint Solution Architect .
I still do a lot of work for my previous employer Recomatics, a company located in Destelbergen near Ghent.
Previously I also worked as a Premier Field Engineer for SharePoint @ Microsoft Belgium.
For 5 successive years I’ve been rewarded as SharePoint Server MVP for my contribution to the SharePoint community: I developed the U2U CAML Query Builder and its successor the CAML Designer, which I develop together with Andy Van Steenbergen.
In the many years I worked for U2U, I worked as technical assistant for Patrick Tisseghem who unfortunately died on 3th September 2008. Together with Patrick we developed the alfa and beta versions of the Silverlight BluePrint for SharePoint which contains several samples on how to integrate Silverlight with SharePoint. You can download the samples from http://www.codeplex.com/SL4SP.
I’m also proud board member of the belgian user group BIWUG.

If you don’t find the answers to your questions on this blog, you can always post your questions to the SharePoint 2010 forum or the SharePoint 2013 forum.
